Working on core strength isn’t a matter of vanity—an effort to turn a dad-bod midsection into a six-pack. (Though it can help.) It’s more of a commitment to kick ass in everything you do.
“Core exercises build a foundation of strength for more sport-specific movements,” says Scott Johnston, a climber, former World Cup nordic skier, and co-author of Training for the New Alpinism: A Manual for the Climber As Athlete. All full-body movements rely on core strength. That means athletes in every sport, not just climbing, will reap the benefits of a strong trunk, from greater endurance to a reduced risk of injury. Below, Johnston shares the ultimate killer core routine.
First, the principles of the routine:
- Do it as a circuit with 30 seconds between exercises. Shoot for four to eight repetitions of any exercise or hold any position for just a few seconds, unless otherwise noted. If that’s too easy, add resistance or drop the exercise.
- You’re finished with an exercise when you can no longer hold a position or do another strict rep or you begin to shake.
- Start with one time through the circuit to learn the exercises. Two circuits will be plenty as you progress because you’ll be adding resistance to the exercises.
- Don’t let poor form take over. Poor form defeats the purpose of the workout because you’ll compensate for the weaker core muscles by using the stronger ones.
- Don’t hold your breath during the exercises.
- As you gain strength, drop the exercises that become easy. They are no longer your limiters, and you’ll be able to spend more time working on the harder exercises.
1. Strict Sit-Ups
Targets: Psoas (deep hip-flexor muscle). Used in cross-country skiing, running, and any form of hip flexion past about 60 degrees. Also engages the rectus abdominis (six-pack muscles). Strengthening these muscles can help alleviate the lower-back pain that often accompanies sitting.
How to: Assume a normal sit-up position—knees bent to about 70 to 90 degrees, back flat on the floor, toes hooked under something so you can pull against them. Cross your hands on your chest so your fingers are resting on your collarbones. Slowly and in control, sit up by flexing only at your hips. Do not crunch by curling your spine. Keep your spine in a neutral (straight) position while coming up to the point where your elbows touch the top of your thighs. Return to the start position for one repetition.

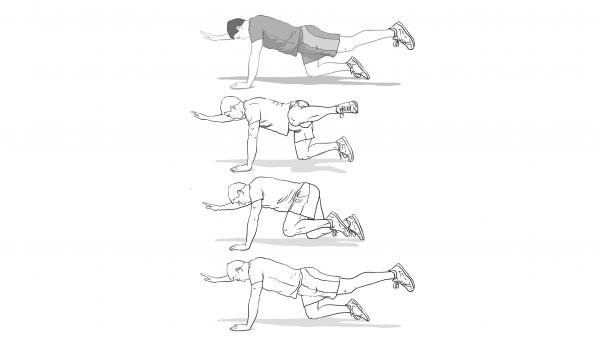
2. Bad Dog
Targets: Hip flexibility and transverse abdominis—the deepest ab muscles that live underneath the six-pack muscles; these are recruited in just about every limb movement. This move is also great for calming a cranky lower back.
How to: Get on all fours with knees directly below your hips and hands directly below your shoulders. Pick up one leg; while holding the knee bent at 90 degrees, draw a big ellipse in the air with your knee. The action sort of mimics the action of a dog peeing on a fire hydrant. While you’re doing that, point the arm opposite the moving leg directly in front of you, like Superman. You may not feel this exercise is tiring, but that’s probably because you have poor hip mobility. Try for 10 slow and strict rotations of each hip.
3. Windshield Wipers
Targets: External and internal abdominal obliques used in all rotational movements, like swinging a bat or golf club.
How to: The name for this move describes the action of your legs as they wipe across an imaginary windshield. Lie on your back with your arms outstretched to your sides and palms placed against the floor. Now, flex your hips so that your feet are together and pointed at the ceiling. Slowly rotate your hips to lower your feet to one side, keeping the feet locked together and knees straight. You’ll want to resist the rotation of your shoulders by pushing down hard with your hand on the side you are rotating toward. Lightly touch the floor with the side of the lower foot before raising both feet back to the 12 o’clock position and onto the other side. That’s one rep. Do this slowly and controlled. If you can’t keep you knees straight or legs together, bend your knees, keeping them pointed at the ceiling when you’re in the 12 o’clock position.

4. Three Point
Targets: The full core structure, front and back, necessary to stabilize the hips and shoulders. This move teaches the brain to fire several core muscles while holding tension from hands to the feet—an especially useful skill for climbers or anyone doing quadrupedal sports.
How to: Assume a good push-up position (a straight line running the length of your back and legs) with hands directly under your shoulders and feet spread about two feet apart. Pick up one hand without rotating your shoulders or hips. Point that hand straight out to the front, in line with your spine, and hold until you feel your shoulders rotate, hips rotate, or back sags. Anything that gets out of line from where you were when you started in the push-up position indicates a failure in strength and the end of that isometric contraction. Pick up each limb in turn and hold until failure. When this is no longer a challenge, you can pick up the opposite hand and foot and hold that. Add a weight vest for an additional challenge when you can hold the posture for more than ten seconds.

5. Kayaker
Targets: Oblique and transverse abdominals needed for counter-rotation of hips and shoulders, such as in paddling, golf, or most throwing movements.
How to: Sit on the floor with legs outstretched. Bring your knees up to about 90 degrees and lift your feet a few inches off the floor so that you are balanced on your sit bones. Clasp your hands together in front of you and rotate your shoulders far enough to so you can reach your hands to touch the floor lightly just beside one hip. Rotate all the way to the other side and touch the floor again. Do this slowly and in control for ten touches total. Hold a dumbbell and touch it to the floor for added resistance.

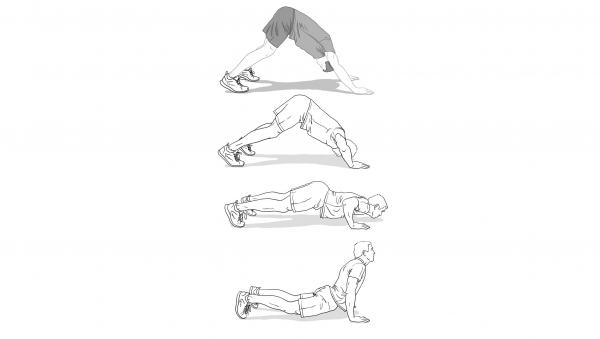
6. Super Push-Ups
Targets: Shoulder health and range of motion. Hits the erector spinae—the muscles extending up your back that help you bend forward and stand up—as the spine is hyperextended through much of the movement. Helpful for general back health to counter all the abdominal work; an imbalance between ab and back strength can lead to pain in either area.
How to: Start in a modified push-up position, with both hands and feet just wider than shoulder width. While keeping your arms and legs straight, walk your feet closer to your hands so your hips rise toward the ceiling, like the downward dog pose in yoga. From this inverted-V position, bend your elbows, lowering your head toward the floor so your nose touches the ground between your hands. Then touch your chin between your hands, and then touch your chest in the same spot. You’ll drag all of these areas across an imaginary line drawn between your hands. As your rib cage reaches this line, push up with your arms so your hips are pressed near the floor, your shoulders are pulled back, and your spine is hyperextended. Reverse this movement by slowly lowering your ribs, chest, chin, and nose to touch that imaginary line between your hands until you are back to the inverted-V starting position. Six reps are plenty for most people.
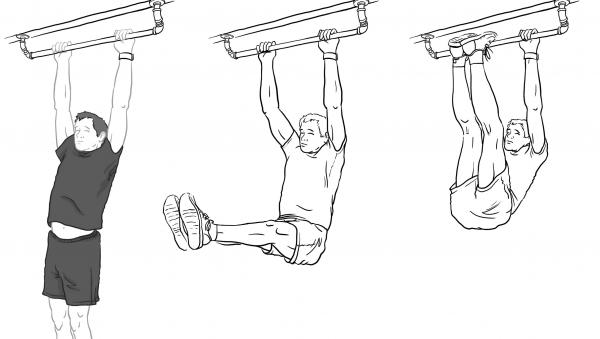
7. Hanging Leg Raise
Targets: Hip flexors, all abs. Both bent- and straight-arm versions require serious hip-flexor strength through the first 100 degrees of movement. The whole abdominal package has to fire very powerfully as the spine flexes. It also requires a lot of shoulder strength to keep from swinging. This is a really great exercise for climbers—and a fun party trick, to boot.
How to: Hang from a bar with elbows bent and locked at 90 degrees. While keeping your legs straight, raise your feet higher than the bar, then slowly lower them. Do not allow your body to swing while doing this. This combines a climbing-specific shoulder position with core control. A variation focusing more on the core and less on the shoulders: Hang straight-armed from the bar, and slowly raise your straight legs to touch the bar with your feet. Slowly lower, and resist any swinging from the bar. If you can’t do this with straight legs, then start with bent knees in the locked position and pull your knees to your chest. When you can complete ten reps, progress by slowly lowering to the count of five. Once you can do this for four to five reps, you’re ready to start using straight legs. Start with bare feet, but I’ve known climbers who can do this wearing double boots.
8. Bridge
Targets: Shoulders. Shoulder flexibility is the most common limiter with this move. It’s also tough on the glute-hamstring-erector spinae complex of the posterior muscle chain (the muscles going up the back of your body). The challenge doubles when one foot is lifted and your hip is flexed because the entire abdominal group has to fire to maintain balance and keep the hips from dropping.
How to: In this exercise, you’ll make yourself into a bridge or coffee table by getting onto all fours—but with your belly facing the ceiling. Hands directly below shoulders, feet flat on the floor directly below your knees. All angles should be nice and square. The first step is to push your navel toward the ceiling as far and hard as you can by squeezing your butt tight; hold. For many, this will be enough of a challenge. The next stage is to lift one foot off the floor by straightening the knee. Your leg will be in line with your torso. Hold this while pushing your navel upward. If you can do this without dropping your hips, then you are ready for the last stage: Flex the hip of the raised leg so your toes are pointed to the ceiling. Do this while keeping your navel pressed high. Hold these end positions as long as possible with no sagging in the core. Any sign of a sag means that repetition is over.

9. Gymnast L-Sit
Targets: Balance, hip flexibility, every muscle from the shoulders to the knees. This hold can help lower your risk of injury during squats and deadlifts by strengthening the muscles that protect the spine.
How to: Sit on the floor, legs out in front of you, toes pointed, knees straight. Place your palms on the floor so your fingers are pointed toward your toes and the heel of your hands are in a line about even with your crotch. Slowly rock your shoulders forward so they come over your hands as your elbows straighten and your shoulders drop. These two actions combined will lift your hips off the floor. Push hard down through your hands and lift your feet while keeping your knees straight. Do not be dismayed if you can’t get your feet off the floor at all or if you can only raise them for a split second. Keep working at it—you’ll eventually be able to hold your feet outstretched for many seconds. Begin with bare feet.

10. Side Plank
Targets: Shoulders, chest, transverse and oblique abs.
How to: Get into the side plank position with your supporting arm straight, one foot against the toes of the other (one in front of the other). Keep your legs straight and in a straight line from head to your feet. Raise the upper hand and point the fingers to the ceiling. Slowly rotate your body so that your high arm (while remaining straight) can come down and touch the floor next to the supporting hand. Return to the starting position for one repetition. When this feels easy, hold a dumbbell in the high hand. It is important to maintain planklike straightness along your spine and legs. Don’t sag or stick your butt in the air as you rotate about the shoulder. Shoot for six perfect reps on each side.

This core workout was adapted from The New Alpinism Training Log by Steve House and Scott Johnston. Copyright © 2015 by Patagonia®.
Open all references in tabs: [1 - 4]